On-site check-in
On this page
This page describes the setup of a scanner that can be used by administrators of a COMS site to register the delegates for participation in the event. The delegates will present a QR code to the administrator/s who will scan it. If the QR code is recognised as valid, the registration status of the delegate will be automatically set to
Registered.Set up a scanner (option 1: use a portable webcam)
This is our recommended option, as it is very easy to set up and portable webcams are inexpensive.
- What you need
- A laptop (recommended), a tablet or a desktop computer with a USB port.
- An external webcam for laptops or desktop computers, with a USB cable. The webcam will be hand-held.
- An Internet connection and a browser to access the COMS site and its scanning function.
- Choosing a webcam
- Plug and Play devices that work without the need to install any software, are recommended. Make sure that they are compatible with your operating system.
- Since the device will be used as a hand-scanner, choose one that is comfortable to hold.
- A webcam with auto-focus is a little bit easier to use, though the scanning works well without.
- Set up the device
- Plug the webcam in a USB port and follow the manufacturer's instructions, if any.
- Log in, as an administrator, to the COMS site, on the computer you just set up, and go to to the scanning function at Participants / On site registration / Conference check-in.
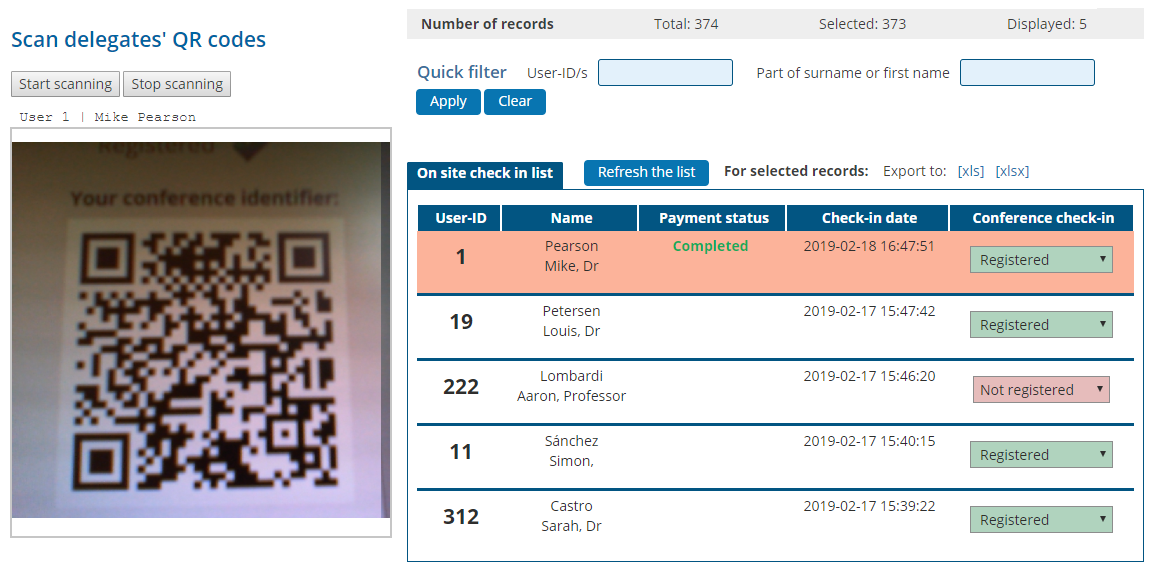
- Find the list of users, below the filter. On the left hand-side, you will find the scanning function, which consists of a display area and two buttons used to start and stop the scanning (Fig. 1).
Set up a scanner (option 2: use a smartphone)
- What you need
- A laptop (recommended), a tablet or a desktop computer with a Wifi connection or a USB port.
- A smarthphone with access to an app store and a Wifi connection.
- If using a Wifi connection, ensure that both devices are on the same network.
- Software to connect the two and allow the use of the phone as a scanner.
- Choosing the software
- There are many options to choose from. These can be found by running an Internet search for "use smartphone as a webcam".
- This will require installing software on both devices: downloading an app on the phone and installing software on the computer that registers the users.
- We have tested the software at
https://iriun.com/, which works on the main operating systems and phones.
- Set up the device
- Install the software on the devices and make sure they are connected, either by Wifi (on the same network) or by a USB cable.
- Log in, as an administrator, to the COMS site, on the computer you just set up, and go to to the scanning function at Participants / On site registration / Conference check-in.
- Find the list of users, below the filter. On the left hand-side, you will find the scanning function, which consists of a display area and two buttons used to start and stop the scanning (Fig. 1). If you have more than one camera connected to your computer (e.g. the computer's camera and your connected smartphone), you will be able to choose the camera via a drop down list before starting the scanning.

Test the scanner
- Activate the scanner
- Click on
Start scanningto activate the webcam.
- Click on
- Give permission to the camera
- You will need to grant
conference-service.compermission to use the camera. This works differently on every browser and might require that you edit your browser settings. If this is necessary, search for permission to enable thecamera. - Fig. 1, above, shows the permissions settings for Firefox. As soon as you click on the start button, a popup appears, asking you to select a camera and grant permission to record.
- If the setup is correct and the permission to record has been granted, the webcam will start recording your surroundings, which will be shown in the display area, below the start button (Fig. 2).
- You will need to grant
- Find sample QR codes to scan
- You can test the scanning on random QR codes, presented on screen or paper. These can be any codes, not just codes generated by COMS. The decoded information, which in most cases consists of a URL, will be printed as text above the display area.
- When a code is decoded, the scanning function emits a beep. Switch your computer sound on if you want this feedback.
- It takes a few minutes of practice to be comfortable with the scanning.
- You can also test COMS QR codes by logging onto user / test accounts on a phone and scanning the codes found on the dedicated QR code page.
Set up the check-in function in COMS
- Step 1: Find the setup page for the configuration of the check-in module
- Go to Configuration / On site registration / Conference check-in.
- Step 2: Activate the check-in module
- This will activate all the functions needed to manage the module.
- The activation function is located at the top of the page, at 1. Activate the module.
- Step 3: Construct a drop down list of registration statuses
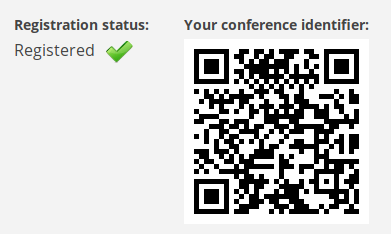
- This can be done at 3. Edit the drop down list of registration options. The resulting drop down will be displayed for each user on the page used to register the participants (Fig. 2). It will be used to record changes in the registration status of each person.
- Before the registration, all users are assigned the default status
Not registered. - When registered with the scanner, this status will automatically change to
Registered. - At a minimum, the drop down list should consist of these two statuses.
- It is possible, however, to add any number of options to the list, for instance
CancelledandWaiting list. These statuses will have to be set manually.
Define a list of participants who will receive a QR code on their COMS account
- Purpose of the QR code
- The QR code stores data that uniquely identify a user and the COMS site of your event. No other data are stored.
- When the QR code is scanned at the event registration desk, it automatically registers the participant. It is therefore necessary to limit the attribution of QR codes to participants who are expected to attend the event (attendees).
- Defining the list of attendees
- Go to Configuration / On site registration / Conference check-in / Define the list of attendees.
- This section contains a filter that can be used to select the users who will get a code.
- The filter consists of two components that can be combined: one, an
additive filter, is used to include users; the other, asubtractive filter, is used to exclude users. In most cases, the additive filter will be sufficient. - Several criteria can be used to include users. For example, you can include all users; instead, you can include participants who have completed their payment for participation in the event; you can also include participants who have been accepted based on other criteria than payments (e.g. following an application process); you can also include individual users. These criteria can be combined. For example, you might include participants who have have completed their payment and add a few organisers who have not, but need to be registered as participants.
- To exclude users from the list, simply add their user-id/s to the subtractive part of the filter.
- After saving the filter, a list of all the users, identified by their user-ids, will be displayed below the filter. You can copy and paste the list in the filters of the
Participantspage, for checking. You can also use it to filter the recipients of the handpicked template in theEmailsmodule.  If you are testing the module, you can set the filter to include just a few administrators, identified by their user-ids.
Display the QR codes on the participants' accounts
- Activate the display
- Before the event, you can activate the display of the QR codes on the participants' accounts and notify them by email.
- To activate the display, go to Configuration / On site registration / Conference check-in / 2. Display a QR code that identifies the participant.
- The QR codes will be displayed on a dedicated page, accessible after login.
- You can verify that the display is working correctly by accessing a few accounts at Participants / Accounts / View, edit user data, making sure that you check both users who are included and excluded from the list of attendees.
- Participants who are included in the list will be able to show the code on their phone or print it on paper.
- Email the attendees to inform them of the availability of the QR code
- In order to target the right users, you will need to use a bulk email with an appropriate filter.
- The handpicked template can be used. To set the filter, either use filter components corresponding to the filter set for the QR code (e.g. filter for users who have paid their conference registration, if appropriate). Alternatively, you can copy the list of user-ids displayed under the filter set at Configuration / On site registration / Conference check-in / 2. Display a QR code that identifies the participant and paste it in the filter component that applies to a list of user-ids.
Register the attendees at the event
- Set up and test one or several scanners for the registration
- This should follow the setup procedure described above. If you want to set up several scanners, you will need to provide an admin account for each scanner operator.
- Navigate to the registration function at Participants / On site registration / Conference check-in.
- Two options are available to set the registration status of a participant:
- Automatic registration, by scanning a QR code This will retrieve the user's record in the list, display it at the top of the list and set the registration status to
Registered. - Manual registration If a user does not present a QR code at the reception desk, you can retrieve his or her record by means of the quick filter displayed above the list. Either input the
nameoruser-idof the participant. Once the record has been retrieved, you can manually set the status in the list to any of the available options shown in the drop down list. The manual option can also be useful if you need to change an existing registration, for instance set it toCancelled.
- Automatic registration, by scanning a QR code This will retrieve the user's record in the list, display it at the top of the list and set the registration status to
- Update of the users' accounts
- As soon as the registration status changes on the check-in page, it is automatically updated on the user's account, as shown in Fig. 3.
- Export the list of registered participants
- You can export the list of users and their participation status to Excel by clicking on the link above the list.
- The filter, above the list, can be used to select the users to include in the export.
Appendix 1: Testing the scanner setup: results of our tests
- Operating systems
- We have successfully tested the scanning on three operating systems:
[Windows, Linux and Mac]. - All performed equally well.
- We have successfully tested the scanning on three operating systems:
- Browsers
- We have successfully tested the scanning on the following browsers:
[Firefox, Chrome, Safari, Edge]. - Edge did not perform as well as the others, but it worked. Firefox, Chrome, Safari all performed very well.
- Older browsers might not work. For example, if you use Safari, make sure you use at least version 11.
- As of 2019, the latest versions of the browsers listed above, all worked.
- We have successfully tested the scanning on the following browsers:
- Camera activation in the browser
- Firefox had the best interface, presenting a popup window with all the required settings, as soon as the camera was activated. If more than one webcam were plugged in, it was easy to swap them.
- Chrome and Safari were easy to use if a single webcam was connected. To select another device than the default webcam (for instance the one embedded in the monitor) required editing the browser settings.
- Edge did not have an intuitive interface. It was difficult to change the webcam.
- Computers
- We tested the scanning on desktop computers and laptops of various sizes.
- All worked, but smaller laptops (12 inches or less) were less comfortable to use.
- Lighting
- Poor lighting or light reflections from windows can hinder the decoding and might require adjustments
- Webcams
- We tested three webcams
[Logitech, Microsoft, Canyon]. - All worked well.
- We tested three webcams
- Our recommendation for the choice of hardware and browser
- Webcams: We would recommend a webcam with auto-focus, though all seem to work well.
- Computers: Both desktop computers and laptops can be used, bearing in mind that the scanning process is CPU intensive. Very lean, energy saving devices like Chromebooks, might be slow. Laptops, being easy to set up and move around are very well suited.
- Browsers: All modern browsers can use a camera. Make sure you are familiar with the camera settings of the browser you choose.
- Operating system: Windows, Mac OS and Linux worked equally well in our tests.