Go to Submissions & reviews / Abstract selection / Accept or reject submissions.
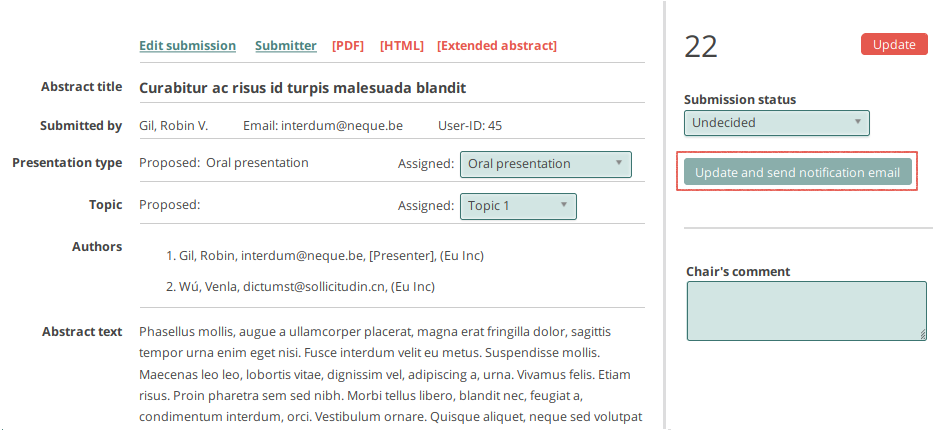
This page contains a list of all the submissions, found at 3. Individual assignments: accept / reject submissions one by one and assign them to sessions and types of presentation . It contains functions that can be used to select the submissions and classify them into topics and presentation types, as shown in fig. 1.
Selecting submissions
Edit the dropdown of selection statuses
The dropdown labelled Submission status (Fig. 1) contains a list of statuses that can be assigned to the submissions. By default, the options included in this list are: [Undecided / Accepted / Declined / ask corrections]. The list can be extended to include additional options. This can be done in the configuration at Configuration / Abstract Selection / Submission status.
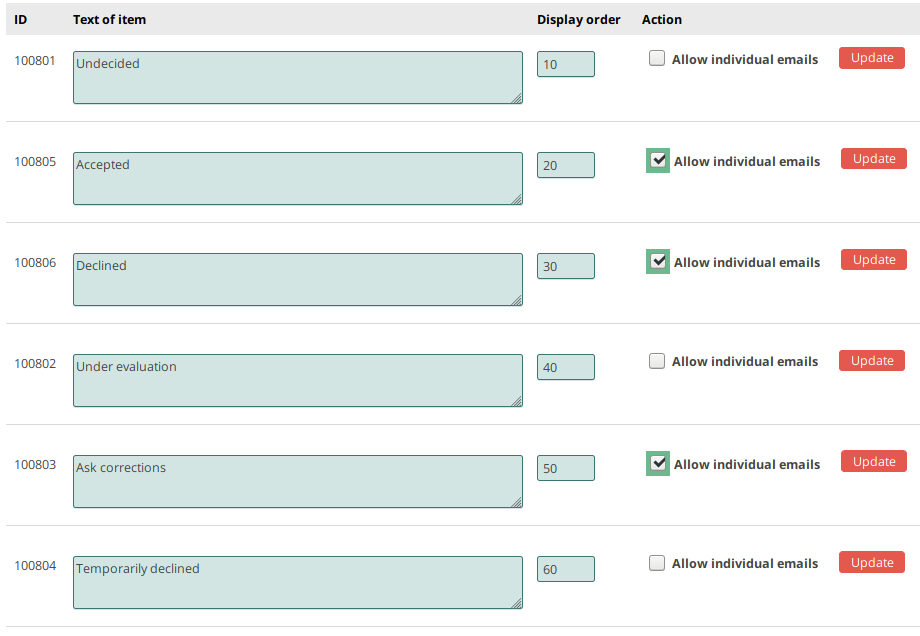
Fig. 2 shows the function used to define the options of the dropdown of selection statuses.
Defining the selection statuses
Enable automatic notifications when setting a selection status
In addition to editing the options of the selection dropdown, you can allow, separately for each option, to automatically send a notification email to the submitter, as soon as a new status is saved. This can be done by checking the tick box labelled Allow individual emails displayed next to the option.
It is not necessary to allow automatic notifications for all statuses. Typically, the option Undecided or other temporary statuses do not need to send an email when set. When such statuses are assigned, the button labelled Update and send notification email is greyed and it is not possible to use the button. For such cases, you can use the button labelled Update.
The status of a submission can be changed more than once. As a result, a submitter might receive more than one automatic notification. For example, a first email might be sent out when the status Request corrections is set. A second notification might be sent again if the submission is later accepted.
The date and selection status are displayed for each submission after an automatic email has been sent.
Fig.2 illustrates the selective enabling of notifications.
If none of the notifications is enabled, the Update and send notification email button is not displayed. Notifications emails can then be sent in bulk, incrementally or in one go, at the end of the selection process.
Edit the notification emails
The notification emails can be edited at Emails / Notification emails / Abstract Selection.
An email template is provided for each of the options of the dropdown of selections statuses.
 If none of the notifications is enabled, the