Setup of the payment form/s
On this page
- You can activate and use up to five independent payment forms. You might use separate forms for different currencies or for separate types of participants (e.g. one form for the delegates and another for exhibitors).
- Once the form/s are set up, you will need to configure related emails and access permissions.
- This page describes the setup of a single form.
Locate the relevant functions
- Go to Configuration / bookings & payments / Form 1 [Conference registration]<, which is the setup page for the first payment form.
- This page contains most of the settings needed to configure the form.
- It is divided in a number of sections corresponding to various tasks involved in the setup.
- The configuration can be done by accessing these sections sequentially.
- What follows gives an overview of the tasks involved.
Activate the form
- The form needs to be activated in order to gain access to all the functions necessary to collect and manage the payments. These functions are removed when the form is inactive, to avoid clutter.
- An active form is recognisable by the green check mark prepended to its menu entry, on the left hand side of the page.
Set permissions to access the form
- You can decide which users can access the form.
- You can also set a time period of accessibility for the selected users. A time zone can be selected at Configuration / Access rights / Access to functions & deadlines
- Details are given at Permissions to access a payment form
Payment options
- Decide whether to allow payments online (needs a payment gateway to be set up to collect the payments).
- Decide whether to allow payments by bank transfers (bank details will have to be provided).
- Choose a currency and VAT options.
Input texts
- Edit the header and instructions seen above the form; edit the label of the tab used to access the form.
- Edit the cancellation policy. This will appear on the form.
- Supply your bank details and instructions for payments made by bank transfer, if applicable. These will appear on the form.
Set up the invoice
- First, decide whether you want to create an invoice.
- If you use an invoice, you need to decide whether it should be generated automatically of manually, by an administrator. An automatic invoice is generated after a participant fills in the form and confirms the order. This happens before a payment is made, even if the payment is performed by credit card. A manual invoice is also generated once an order is confirmed, but needs the intervention of an administrator.
- If the invoice is created automatically, you can supply a template for the automatic creation of an invoice number. If the invoice is created manually, you can either generate the invoice number automatically or manually.
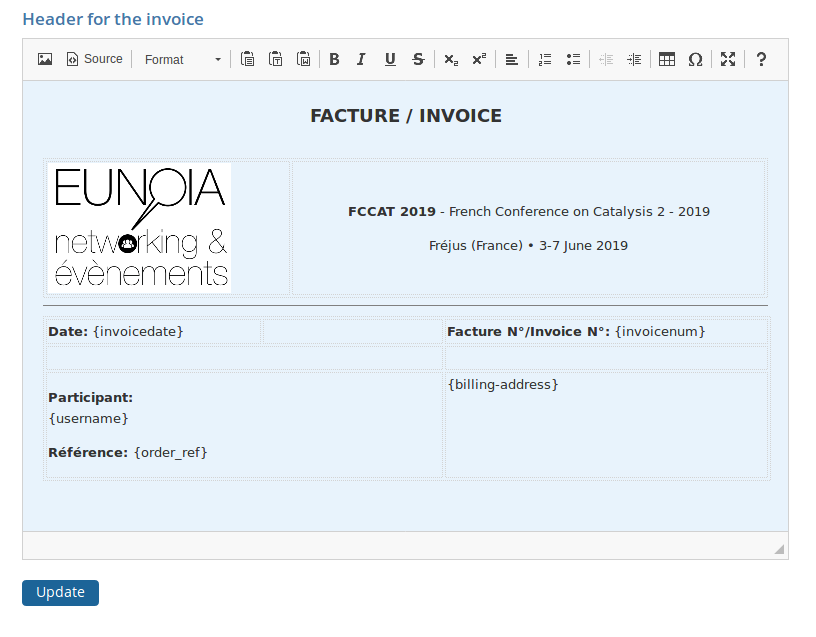
- Configure the header and footer of the invoice and receipt. An editor is provided to help format the texts that appear above and below the orders. These can include pictures (logos) and placeholders to personalise the content (e.g. the participant's name or a reference to a participant's order, as specified by their university. Typically, the bottom part of the invoice contains your organisation's details, as well as your bank's details, if payments by bank transfer are allowed. The items relating to the order are generated automatically by the software and inserted between the top and bottom parts.
- Once a payment is completed, a receipt is emailed to the participant, provided this option is set up by administrators. The receipt looks similar to the invoice, but contains additional information about the status of the payment.
Configure the form
- The section devoted to the configuration of the form contains an overview of the fields already included on the form. A few fields are included by default, for example, the billing address of the delegate. Any field added to the form is added to the overview. The overview list details about the field (its type, its label, its position on the form, whether it is mandatory and an optional time period during which it is shown on the form. These data can be edited.
- Items that can be booked by users can be added to the form by inserting and configuring ready-made components. There are several types of components, described in the next section and shown in the picture below. These consist of: a single option among several (radio buttons); several options among a given list of options (check boxes); an input box to specify a number of tickets (e.g. tickets for the conference dinner). These components can be used with or without prices, allowing in some cases, to register for free events (e.g. free workshops, free social event). In addition, you can also add helper components to the form (separators, texts, images).
- Once a component has been added to the form, it appears in the overview and is accessible for configuration. You can define dates of availability that coincide with your deadlines; you can edit the texts around the component (its label, instructions); you can reposition it on the form; you can specify options to choose from (e.g. registration for students, registration for academics); you can add prices, individual VAT rates, if applicable and add a discount code.
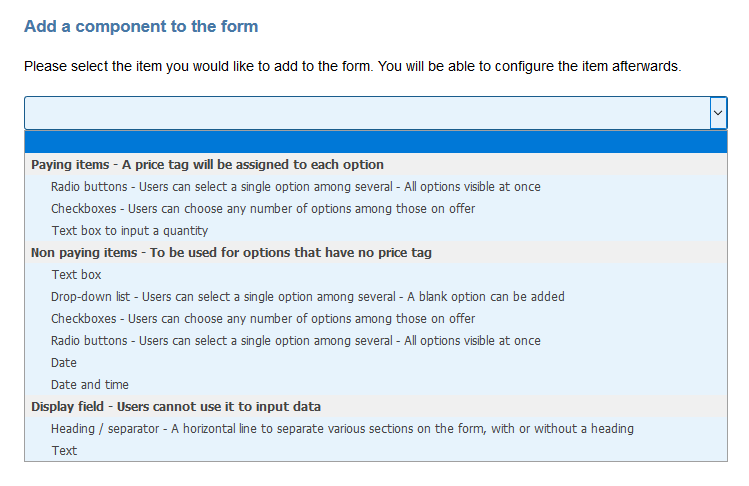
Choosing the right component to add to the payment form
The items that can be ordered on the form (conference registration fee, conference dinner, workshops) can be created by adding ready-made components to the form, and them editing their properties (label, price, options, instructions). These can be selected from a list shown in the figure shown above. What follows, describes the component and their suitability for various items.
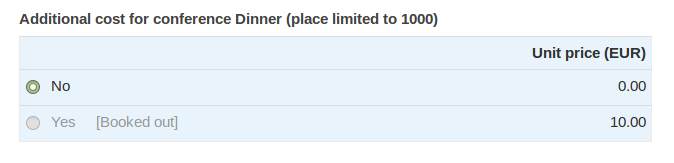
- Paying items - radio buttons
Example showing radio buttons with price tags 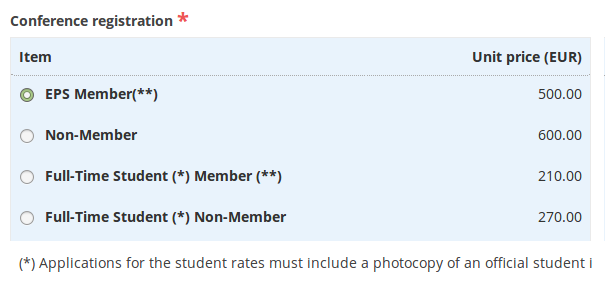
- Radio buttons are suitable if users must choose a single option among several.
- This is typically used for the conference fee.
- The first option is selected by default.
- It is possible to mix paying and free options, by setting the free options to 0.00.
- A discount code can be defined for each option.
- A quota can be defined for each option, or for a group of options.
- Paying items - check boxes
Example showing check boxes with price tags 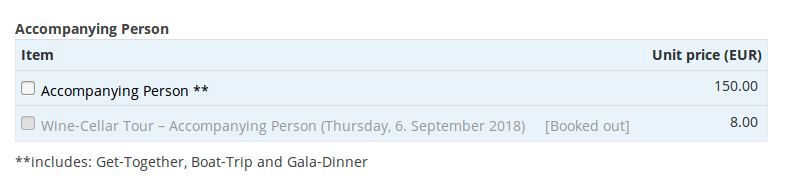
- Check boxes are suitable if users are allowed to select several options in a list.
- This is typically used for social events and workshops. Care must be taken to ensure that the various options do not overlap in time.
- If the choice is set to optional, users can choose not to select any option.
- If the field is set to mandatory, users are forced to choose at least one option.
- It is possible to mix paying and free options, by setting the free options to 0.00.
- A discount code can be defined for each option.
- A quota can be defined for each option, or for a group of options.
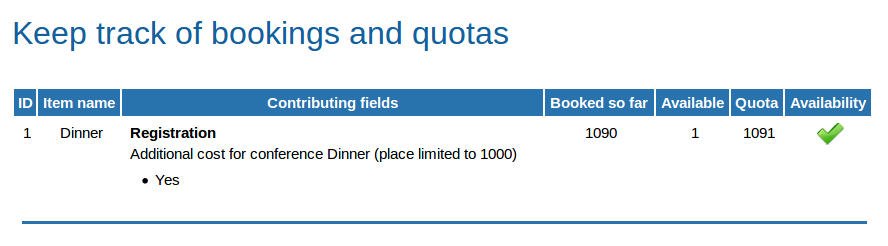
Setting quotas
- It is possible to set quotas on all the items found on a form (any form, in fact).
- To set a quota, go to Configuration / Quotas.
- The creation of a quota involves three steps:
- Name the quota (e.g. "Conference dinner"),
- Set the quota (e.g. "300"),
- Select all the items that contribute to the quota (e.g. "Dinner for the participant" + "Dinner for an accompanying person" + "Extra tickets for other accompanying persons".
- Once quotas have been defined, a menu labelled "Quotas" is activated on the "Participants" page. It allows administrators to track the number of orders for each item.
- When a quota is exceeded, it becomes inactive (gray) on the form. Further orders cannot be made.